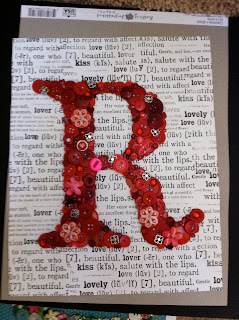
This weekend my family and I are visiting my sister {Megan} in Northern California to attend my nephew's first birthday party. We came a day early to have a "family craft day". Yesterday we {my sister, mom, daughter, and me} sat around the table working on our crafts. Three of us made button monograms. Here's how we made them.
First, we printed giant letters for our last names and a peace sign for my daughter. I used a font called Plantagenet Cherokee at 700 pt with an outline setting. Then we cut them out and traced them with pencil onto a piece of card stock.
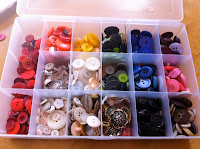
My mom and sister have an endless supply of buttons, beads, and brads. So that gave me a nice variety to choose from.
Next, we used tacky glue to place the first layer of buttons.

Today we went out and I bought a frame for mine. I can't wait to get home on Sunday and hang it up!!!
Here's how my mom's and my daughter's turned out: {still awaiting frames!}
Our family crafting day was so much fun and I love how our button projects turned out! Megan will be posting another project we made sometime next week!


Seriously adorable!! I think you've inspired me :)
ReplyDeleteSo beautiful! I love the red buttons on the black and white background. Where did you get the background paper? Is it scrapbooking paper?
ReplyDeleteI so love this!!!
ReplyDelete4th Grade Frolics
These are so cool. At first I thought you meant like a button you wear. I'm a little sleepy and it took me a minute. I might have to put this on my craft things to do. Thanks for sharing.
ReplyDeleteThe red is absolutely stunning. I love the idea!
ReplyDeleteThis is such a cute idea! And I love that you are in town visiting Megan and having family craft day. Have fun while you are here!
ReplyDeleteAh! I can't get over how amazing you are! Every time you post I get so excited and so jealous of your creativity at the same time! These are so beautiful! Especially the bright of the red on top of the black and white.. we have a black/white/red theme in our living room. It would look awesome! Keep inspiring!
ReplyDeleteLove it! I love to do initial stuff and made their teachers one with crayons this year. We are still on summer break, so I think i am going to get the supplies and let my littles decorate their own and hang them all together. I shared this on my Facebook page- thanks :)
ReplyDeleteErika, yes the paper is scrapbook paper. It's something my sister says she's had since she first met her husband {10 years ago or so}. :)
ReplyDeleteSO cute Rebecca!!!! I LOVE it!!! have to do this... I have a collection of buttons just sitting in jars!!! They would look pretty as a letter F...(((GRINNING)))
ReplyDeleteI love the red button R behind that paper! So pretty!!
ReplyDelete-Meg
http://thoughtfullysimple.blogspot.com/
I absolutely love this! I think to help save time I would directly print the outlined letter onto the scrapbook page. No cutting or tracing! Thanks for this beautiful project idea!
ReplyDeleteSuper cute! Thanks for the idea!
ReplyDeleteCrystelle
http://www.crystelleboutique.com/
How do you get the outline setting? Love these.
ReplyDeleteIs the blue paper a scrapbook paper? Did you stencil on it? I can't locate it anywhere!
ReplyDelete